Event Tracking
Configuring Google Analytics event tracking is vital to data analysis, because it is used to track user interactions. Analysing pageviews, sessions and visitors only lags context about the engagement of a website visitor.
This is solved by collecting additional data from custom events that capture user interactions, such as link clicks for example.
Events represent user interactions or occurrences.
Usually, the most important interactions stand in relation to the goal of the website.
Hence, we set up custom event tracking to use it as a performance indicator to see, if our goals are being achieved.
Events can be grouped into hard conversions and soft conversions to account for their relation with the overall goal of the website.
Since events often are the basis to monitor conversions in an ecommerce or remarketing context, it is sometimes referred to as conversion tracking.
I distinguish between conversion tracking and tracking an event, since a conversion could also be a pageview or a passive occurence, as for example spending a certain amount of time on a landing page.
To illustrate what event tracking means, I will show you how to set up click tracking on a submit button. Afterwards, you should be able to set up your own unique click events on any element you like - so let's get started!
What is event tracking in Google Analytics?
An event can either be an active user interaction or a passive occurrence. Tracking them means to watch or count the occurrences and set them in relation to users, visits and other dimensions for later analysis.
Since you are free to configure events the way you want, they can take many different forms.
Examples
- add a product to a shopping basket
- signup to an email list
- scroll down to the bottom of an article
- click play in a video
- user login
- click on an image to zoom
- submission of a contact form
- outbound link click
- print an article
- download a file
As you can see, events are usually tied to something the user does, based on monitoring...
- mouse clicks
- mouse movements
- scrolling
- browser navigation
- keyboard inputs
Events can also be passive, without the user doing anything actively.
For example, when the user spends a certain amount of time on a page or when a form returns an error. Also when a chatbot window opens up to talk to the visitor, there is no activity coming from the user.
Though a page view is technically also an interaction, the most widely used Universal Google Analytics counts a page view not as an event. However, the new Google Analytics App + Web (currently in Beta) uses a different data model which tracks page visits as events too.
Event types
We can distinguish between two types of events:
Active events (with user interaction)
- mouse clicks, scroll tracking and mouse movement
- screen touch
- keyboard inputs
Passive events
- hitting a predefined time threshold
- Server responses
- Programmatic validations
- Third-party script execution
Note that with tracking active and passive events, you can re-construct a big part of the customer journey.
Such data enables you to draw conclusions about the user's experience from beginning to end. If you find any flaws in the journey, you can now take action to reduce those negative experiences.
Structure of Google Analytics Events
Each event in Google Analytics holds some event fields, or bits of information about the event, that we can use to describe the occurrence:
- event category - to categorize events in groups. In the context of a contact form, for example, you would want to group all events into an event category contact form
- event action - to describe the interaction, e.g. form submission
- event label - to add additional information about the interaction. For example, if the user is sending the address of their website along with the form, you use it to distinguish between the received forms
- event value - (optional) to add a numeric value to the information. For instance, if on avg. every 25th contact leads to a 100$ conversion, we could assign a value of 4 to each event.
- event non-interaction - to distinguish between an active or passive user interaction.
By default, it is set tofalse, which means the event counts as active. Important: Active events affect the calculation of a page's bounce rate, by lowering it. So if you ever struggle with an unrealisticly low bounce rate, chances are some events user-interaction is set totrueby mistake.
Implement Google Analytics event tracking
There are two possible ways to implement custom event tracking:
- Implement it with javascript snippets on all relevant HTML elements along with an onclick event handler - I don’t recommend this approach, since it is error-prone and not scalable. If you want to do this anyway, you can find code examples in Google’s event tracking documentation:
- Setting it up with Google Tag Manager or another tag management system of your choice.
Ease and flexibility when implementing changes, as well as scalability and easy integration with third-party services make it the preferred implementation method.
I will explain how to track events with Google Tag Manager, since it is the most widely used tag management system everyone can get access to.
If you want to learn more about GTM, like how to set it up and track things like outbound links and downloads, read my Google Tag Manager tutorial.
Guide to track events with Google Tag Manager
Setting up custom event tracking can be broken down into creating a trigger for the event, as well as creating an event tag, which populates the event properties (category, action, label, etc.).
The values for the event properties can either be assigned statically or dynamically - where the latter is preferred for scaling the configuration over larger sites.
As an example, we are going to implement Google Analytics tracking for a button click. Click tracking is the most commonly used form of user behaviour tracking, so the example should be applicable to many other use cases.
At this point I assume that you already created a tracking ID and that the tracking code was implemented across the whole site when you set up Google Analytics with GTM.
Configure the event trigger in Google Tag Manager
- First, we have to log into our Google Tag Manager container and create a new trigger.
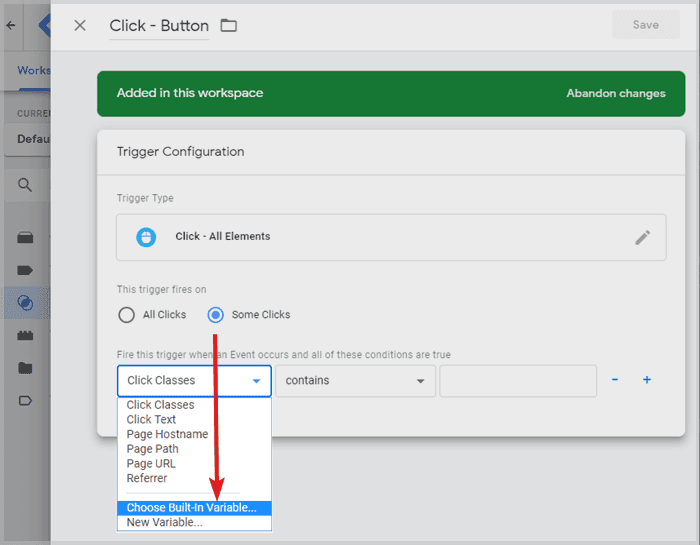
- Give your trigger a name, for example Click - Button, and click on the trigger configuration field to select a trigger type. You will see a list of trigger types slide in from the right.
- Choose All Elements as the type and select, that the trigger only fires on some clicks.
- Then, in the first dropdown, choose Click Element. If it's not listed, just click Choose built in variable… and activate it.
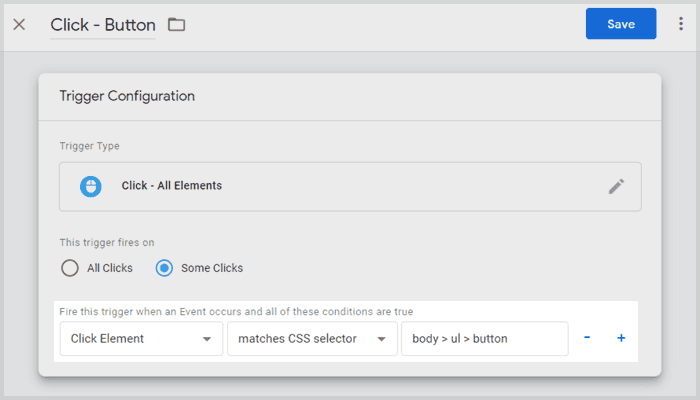
- In the second dropdown, choose matches CSS selector.
Now let me explain what we’re doing:
We are trying to generate a click trigger for a specific HTML element on your website - the one you want to be tracking clicks on. In my example, it is a button, but it could also be an image or a<div>tag, or any other HTML tag - so the question is: How do we tell Google Tag Manager (GTM) which element to observe?
The Answer is: CSS selectors - You don’t know what that is? It is just a programmatic way of specifying HTML elements on the page and I will show you a way to get the CSS selector for any element with just a few mouse clicks. - In Google's Chrome browser, right-click any element you would like to track clicks on and select inspect. Chrome Developer Tools will open up and by default, the HTML element will be pre-selected.
- Then you simply right-click the element and choose Copy > Copy JS path (avoid copy selector - it returns faulty selectors from time to time).
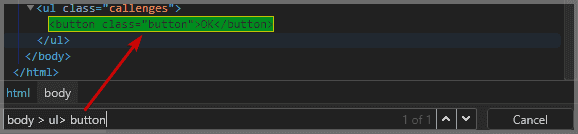
- If you paste the content of your clipboard into a text editor, you will see you copied something like:
document.querySelector("body > ul > button")
We want to take the part that is inside the brackets, without the “”. So, this part:body > ul > button - This is the CSS Selector we need to paste into the last field in our trigger configuration in GTM (see below).
Copy that value and paste it in. Click save.
Notice you could do this with any element and set up any event trigger in GTM as you like?
We are not done yet. After setting up the trigger conditions for our event, we have to configure the Google Analytics event tag to make sure the right data is sent to the Google Analytics property.
Create a custom event tag
Now that we have a trigger, we need to combine it with an actual event tag. You can think of triggers and tags as the when and what in our example:
The trigger defines when we want to track an event (when our button is clicked), and now we will define a GA event, that describes what we do: Send an event to GA including all the right values for the event properties.
Let’s get started.
- In Google Tag Manager go to the tags menu and create a new tag.
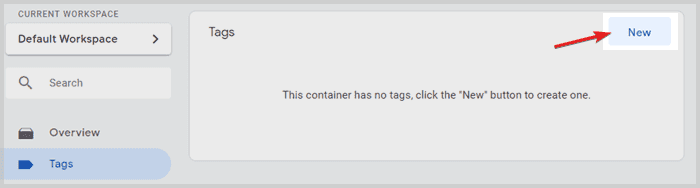
- Give the tag a name like Button Event and click on tag configuration.
- A panel from the right side is going to slide in with a list of possible tag types to choose from. Select Google Analytics - Universal Analytics.
- Back in the tag configuration, set the track type to event. Now you will see more fields showing up for the event data.
- Let’s assign static values for event category and action and let’s make the event label populate dynamically.
Call the category click events, for example, the action is just click and for the label click on the Lego brick symbol next to it. - We want the label to always hold the text that is written on the clicked HTML element, so in case we are tracking multiple buttons, we could distinguish between them.
After clicking on the Lego brick, a panel is going to slide in to choose a variable. Click on built-ins in the top right corner, unless you already see click text in the list of variables (then just select it and skip the following step).
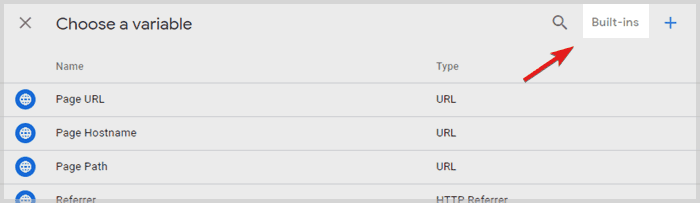
- In the list of built-in variables, activate click text and GTM will add that variable in the label field in curly braces, like this:
{{Click Text}}- Double curly braces are the internal way in GTM to reference variables. - The value field in the tag configuration can be filled with a value the event click may represent.
In my example, I leave the field empty because I don’t have any meaningful monetary value for the button click. - If the event is interactive, select false for the non-interaction hit. If it is a passive event, select true.
- In the Google Analytics settings variable, select the variable you configured when you set up Google Analytics.
- If you have not configured a settings variable, just set a checkmark for Enable overriding settings in this tag and add the tracking ID (e.g. UA-12345678-91) from your Google Analytics tracking code.
- Finally, scroll down to the triggering configuration, click on it and select the trigger we configured shortly before: Click - Button
The entire event tag configuration at once:
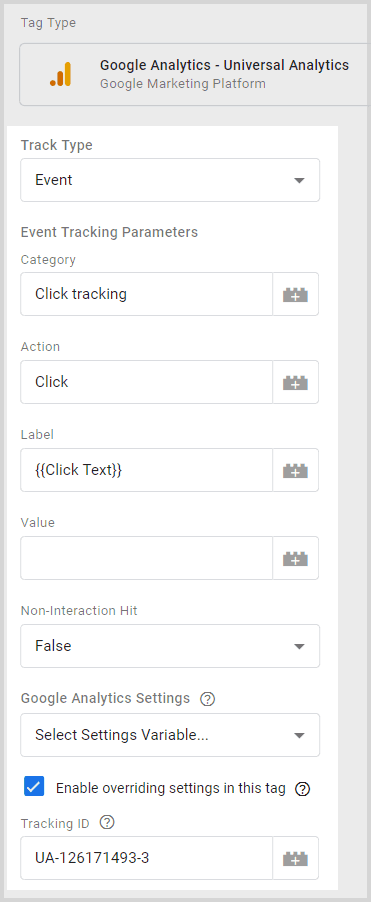
- Now click save in the top right corner and you are done setting up the GA event.
Great! The next step is to doublecheck if our onclick tracking setup works.
Debugging events
To debug the setup, enter the preview mode from the Google Tag Manager overview:
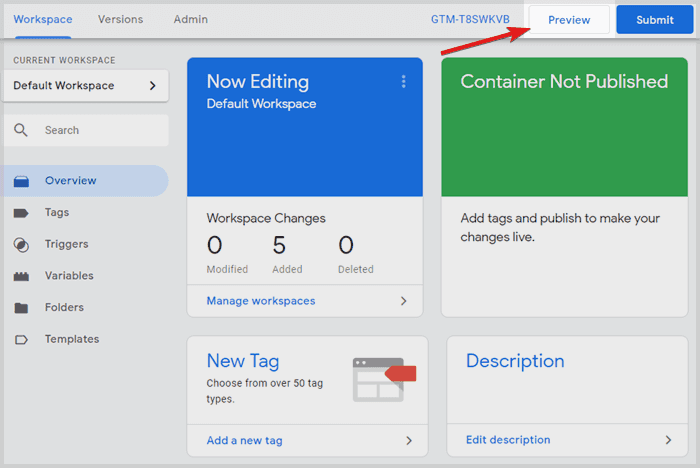
Afterwards, we visit the page that holds the submit button. Due to the Google Tag Manager preview mode, we have certain cookies set in our browser, that will open a debugging window on the bottom of the page:
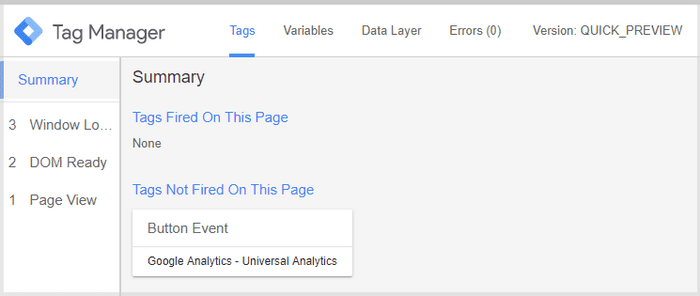
If you now click on the button to test the event tracking, you should see a click appear in the left summary panel, and the main debug window should show that our event fired:
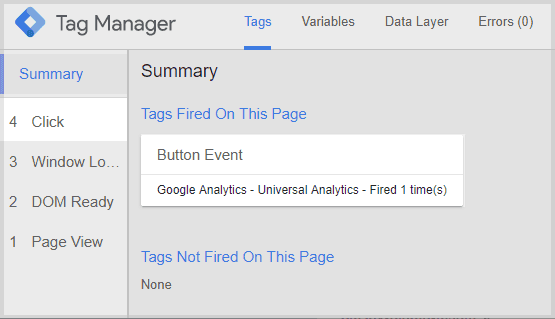
If you click on the button event you can verify the event fields that were sent along with the event hit:
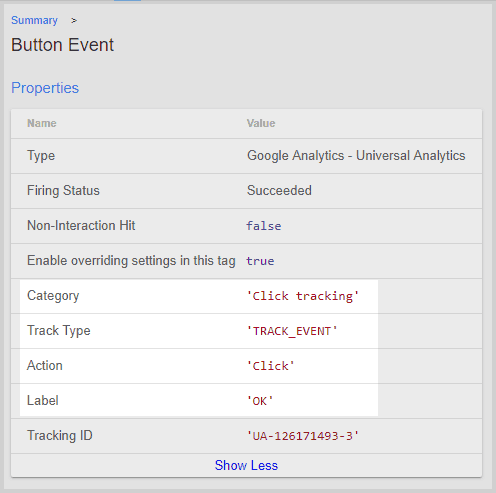
See how the event label has been populated with “OK” automatically? That is because we used the click text built-in variable in Google Tag Manager, which always holds the text of the clicked element.
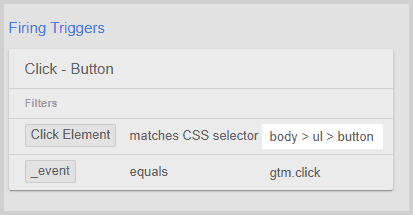
More importantly, if you scroll further down, you can verify the rules for the event trigger:
TIP: To verify that your Google Analytics account successfully received all data, we can visit the realtime report for events in Google Analytics. In case a few minutes already passed by since the last button click, the viewing for the previous 30min should help.
CSS Selector validation
In case, the debugger did not notice your button clicks and did not show any click event, there is probably something wrong with the CSS selector.
TIP: you can open chrome developer tools on the page with the element you want to track by either pressing F12 or right-click > inspect and visit the elements tab. If you now press CTRL+F or CMD+F on Mac to search for an element, you can simply paste your CSS selector into the search field and dev tools will automatically jump to the element:
This way you can verify if your CSS selector works. If dev tools is not jumping to any element in the code, there is something wrong with the selector. There are also browser extensions that can help you get the right selector.
After debugging and fixing selectors we should finally have the click tracking running and can go back to Google Tag Manager to leave preview mode and submit the changes.
Congratulations to you so far! You've configured event monitoring for clicking a button based on a CSS selector!
With the setup working now, you can set up event goals in GA! Google Analytics goals are a helpful feature, as you can break down reports and see how many conversions have occurred for a given sub-segment.
To set it up, you simply have to define a custom Google Analytics goal with the category, action and label fields matching your event and then it will be counted as an event goal.
Advantages & Disadvantages of tracking with CSS selectors
It is important to mention that setting up event tracking based on CSS selectors is not the most robust way.
The entire event setup will break, if the CSS selector doesn’t work. It is a critical dependency, which represents a weakness in this approach of setting it up.
But why would the selector ever stop working?
Because the bigger the website, the more changes are happening to a site, and the more people are involved - possibly simultaneously in different teams.
As soon as a change effects the structure of our selector, it will stop working.
A frontend developer may well add some changes to the page on some day in the future, which could cause the selector to break. Hence, it would be more robust to add an onclick event handler to the element, which pushes all event properties to a data layer. This is the recommended approach for important KPIs and for big organizations, where changes are not overseen.
Advanced web analytics implementations that integrate databases and third-party data sources use a data layer to track events. Please read that article for the required event-tracking code.
Using a data layer is more secure and reliable but requires a thorough implementation.
Instead of relying on CSS selectors, you use event listeners for browser events as a trigger. GTM also uses click event listeners under the hood when you set up a click trigger, but when basing tracking on a data layer you can more freely choose which browser events should be tracked.
Especially for a single page app (SPA) without page loads between page navigation, a data layer can be well used to track virtual pageviews as events and have them count as regular page views in Google Analytics.
For smaller websites the effort of implementing a data layer is not always justifiable. In such cases event tracking based on CSS selectors is a valid approach.
The advantage of using CSS selectors is clearly the ease of implementation and how quick you can start collecting data. This can be helpful too if a data layer implementation may take a while, due to a shortage of resources, because you may be able to already collect some of the data just with CSS selectors.
The disadvantage is, that this way is almost prone to break someday, depending on how many changes are implemented and how many teams are working on the website.
But if you are setting up web tracking for your own site and you are in control of the changes, feel free to follow this method. Simply be aware, that changes to the page's HTML structure can break the CSS selector.
However, Companies with a budget and high requirements for data quality should choose a data layer as the foundation for their event tracking setup.
Event reports in Google Analytics
Now that we set up tracking for user interactions, we have to make sure we stay on top of the amounts of events that are sent to the Google Analytics account.
The best way to do this is either with the built-in event report, with a custom report or a Google Analytics dashboard.
In Google Analytics, you can go to Behavior > Events > Top Events to find the event data you tracked:
Since there is no default event name available in GA, you will see your event categories first. You can also choose the primary dimension to be event action or event label to drill deeper into the report.
Note that the events report gives us a column with Avg. Value, which comes in handy, if we need the average value of our click events. This may be relevant for an web app that calculates prices, where the final result is tracked with an event. This way, you could easily find the avg. value of a users calculations.
Other common examples of useful avg. values are e.g. filter settings for prices or sizes in an e-commerce shop.
So keep in mind, that an event value may seem unrelated at first, but there may well be a related value to assign to the event anyway, since it would be helpful to check average values across the board.