Google Tag Manager Tutorial
As a Google Tag Manager consultant, I've set up GTM on 100+ client websites. This Google Tag Manager tutorial is where I teach you the process I've refined over the years, step by step, with examples and videos for you to learn.
Further down, you can download a GTM setup configuration file with all of the following best practices to import into your container.
If you can't wait, jump right into the installation tutorial or learn how to set up Google Tag Manager. But if you are a beginner it is important to first understand how to use a tag management system together with other tools.
So keep on reading below first.
How to use Google Tag Manager?
I assume you already know what Google Tag Manager is. So lets talk about how GTM works and how to use it.
Ideally, you only want to have one 3rd-party tag in the source code of your website or web app.
The only 3rd-party tag on your website should be the Google Tag Manager code snippet.

All other tags are then implemented through the tag manager itself. Other marketing and tracking tags are e.g. Google Analytics (GA), Facebook, Twitter, Linkedin, AdWords, DoubleClick and god knows what.
The primary reason are the advantages of Google Tag Manager:
- easier & faster implementation of marketing tags
- scalability on every page and across multiple domains
- built-in triggers for form submissions, scroll tracking & video tracking
- manage users with multiple gtm accounts
- a bit faster site load speed
Due to these advantages, already 30% of all websites on the internet use a tag manager. And among them Google Tag Manager has a market share of 94%.
So, unless you have a solid reason not to add a tag to GTM, as a general rule of thumb, add all tags to the GTM container.
Use GTM like a connecting layer between your website and 3rd-party tags.
Use GTM like a middle-layer between your website and 3rd-party services. Without it, your site and 3rd party tags are not in direct connection. Those services are mostly JavaScript libraries for marketing or tracking tools that are implemented with a tag. But any other tags apply as well.
The only exception to the rule applies when you do conversion optimization with split-testing tools.
Because during conversion rate optimization, A/B tests are going to load different variants of a page. So the visitor may see how the content is re-rendered for a split-second.
To avoid CSS flicker and ensure that variant tests load fast, a split-testing tag may also go directly into the source code.
Now that we have this out of the way, let’s look at the implementation.
Install Google Tag Manager on your website
Let's start the Google Tag Manager tutorial by showing you where to get the Google Tag Manager code snippet and then where to install it on the website. You can log in just by using your usual Google account.
Create a Google Tag Manager account
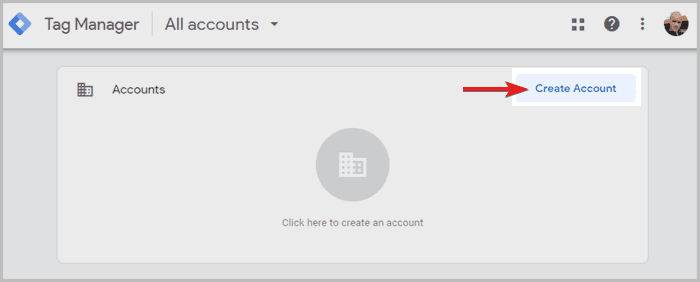
To install GTM, you first have to go to the official website and create a new Google Tag Manager account.![Google Tag Manager account creation]()
First, create a Google Tag Manager account, and choose a container name, like your website name and then get the code snippet. Create a web-property
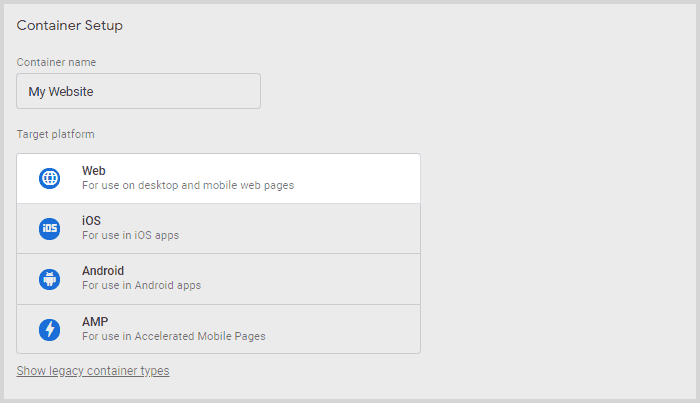
Select the Web property to get a code for a website or web app.![GTM container name and web property selection]()
There are multiple types of containers available in a GTM account. For websites, choose web. Note that there are other tag manager container types for AMP pages, iOS and Android too. Implement the Google Tag Manager code
- Afterwards, you will be shown the Google Tag Manager code to implement on your website.
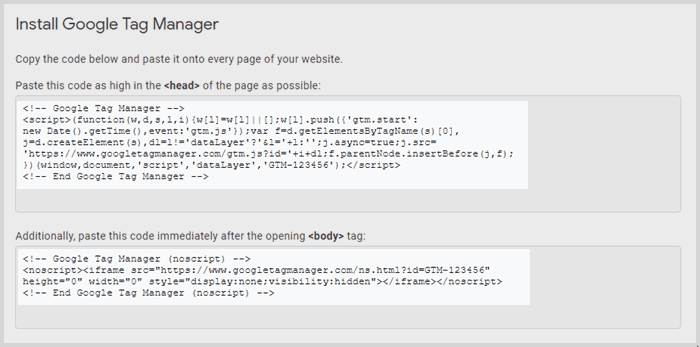
- Take the first part of the container tag and put it as high as possible in the head tag on every page of your website. This ensures that you can fire tags early during page loads.
- The second part is an iframe to run in browsers that have JavaScript disabled. Install the tag as high as possible in the body tag on each page of your website.
![the dataLayer is positioned before the TMS tag in the source code]()
The first tag in the <head> is a data layer. Don't worry if you don't know yet what that is (first arrow). Next is the first part of the GTM tag (second arrow). Finally, the other part of the GTM tag is implemented high up in the <body> element. or JavaScript code can be implemented in between, but a data layer is always implemented before the GTM tag and the <noscript> GTM tag is always last.
![Google Tag Manager code snippet]()
This is the Google Tag Manager container tag. It has two parts. The instructions how to implement the script tags are written above each part.
This is the common method to implement GTM.
Do you use a popular content management system? If yes, you can also use a plugin that takes care of the Google Tag Manager installation.
That said:

If your CMS also offers you a plugin to install other tags
Don't use yet another plugin to install Google Analytics, Facebook or Google Ads.
Instead, use GTM to install those tags.
- It will result in a faster page load speed
- It gives you more options to configure the tag
The GTM user interface also receives updates with new features regularly, so you are almost always better off implementing other marketing tags directly with it than with another integration.
Plus, the gains in load time are good for your bounce rate and help SEO.
Use a plugin to implement GTM
Below a list of the most common content management systems and their plugins to install Google Tag Manager.
WordPress
There are two WordPress plugins to implement GTM that I would use. First, there is the classic option called Google Tag Manager for WordPress.
The second option is Site Kit by Google. It primarily allows you to add a dashboard to your Worpress backend showing information from your Google Analytics account and Google Search Console data - which is pretty sweet. And it also allows you to install GTM.
Shopify
For Shopify, there is a free plugin for GTM installation creatively called Google Tag Manager Installer.
Squarespace
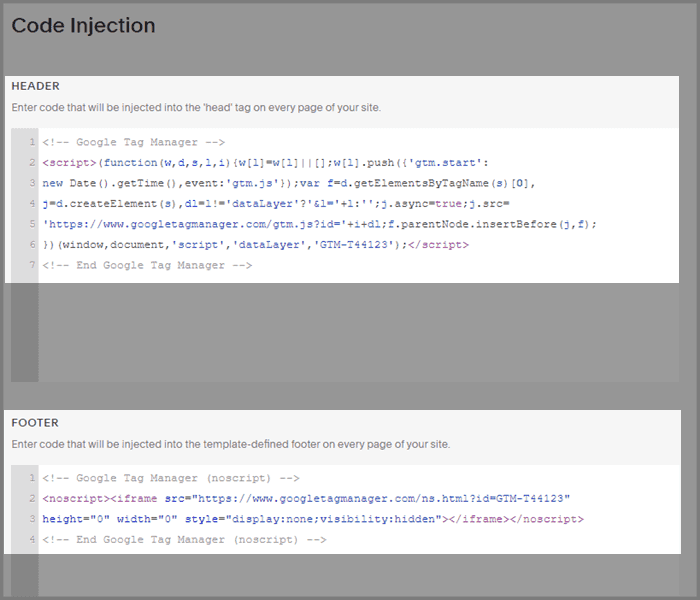
For Squarespace, there is no GTM extension or plugin. But you can add the GTM tag manually, by visiting sidebar > settings > advanced > code injection.
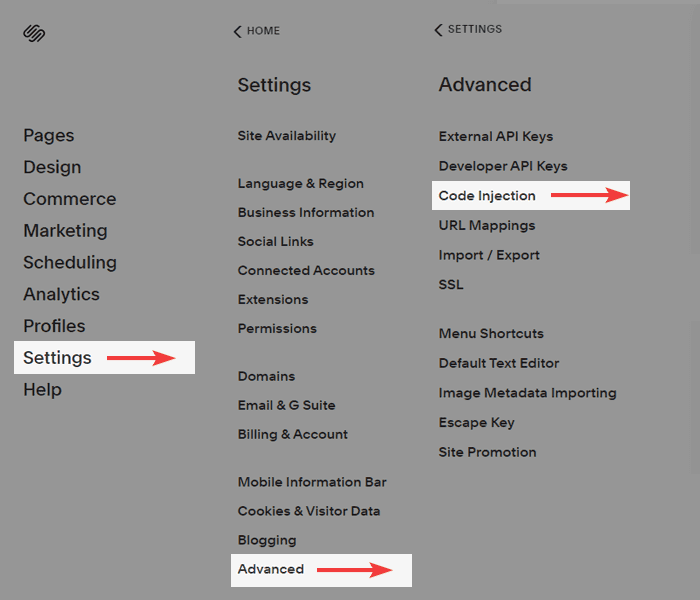
Next, you paste the GTM tag into the form fields like this:
Wix
Visit the main menu for your Wix website on the left sidebar. From there visit Marketing & SEO and then click on Marketing Integrations further down in the sidebar.
Then you will find multiple Wix integrations for Google Analytics, the Facebook pixel and also one Wix extension to implement Google Tag Manager.
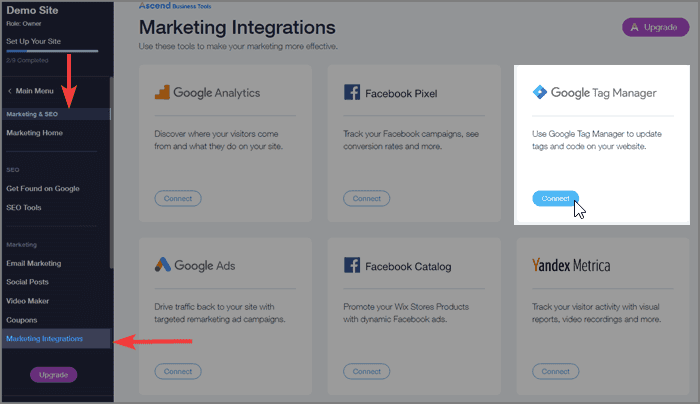
Click on connect and get Google Tag Manager installed.
How to check if GTM is working?
When you first log in to GTM
Go to the submit button and publish an empty container.
Otherwise, once you test if GTM works, the script will return a 400 response error and you will spend hours debugging why. 😭
It's a classic 😉
After you implemented the GTM script and published a container version (important), you can test if Google Tag Manager is working by doing any of these checks:
Preview and debug mode
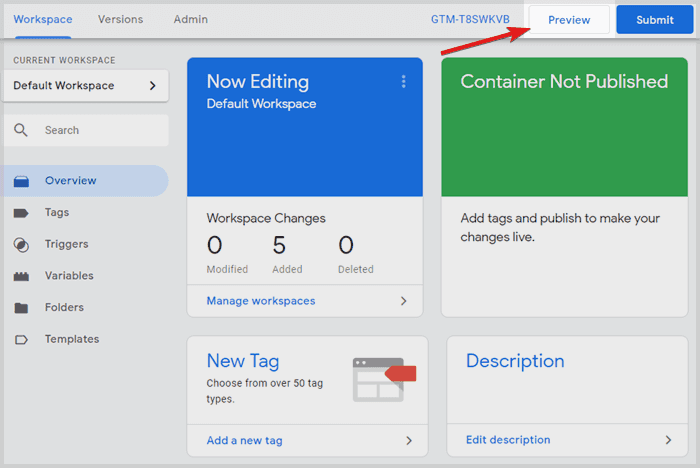
Log into your GTM account and click on preview. Then, open a new tab in the browser and visit your website. The GTM debugger window should pop open on the bottom of the window if GTM works correctly.![Activate GTM debugger mode]()
Activate the GTM debugger mode to check if GTM is working correctly. Chrome Developer Tools
Open Chrome Developer Tools with a right-click on any page of your site and select inspect (Alternatively F12 on Windows and Shift+CTRL+J on Mac).
Then you go to the network tab and simultaneously reload the web page (F5 on Windows and CMD+Shift+R on Mac). The network tab will fill with all network requests necessary to load the page.
In the filter field in the top-left, type gtm.js to find the request for your JavaScript code and verify it has a status code of 200.
Let me show you:
If you don’t have a 200 status code, maybe you forgot to submit and publish a container first in GTM?Google Tag Assistant
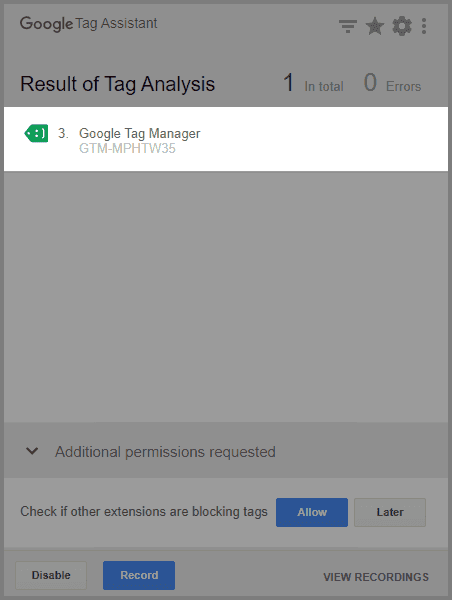
Install the Google Tag Assistant Chrome extension and start it on your site. It should call out a GTM container ID.![Google Tag inspector validates GTM is loading correctly]()
You can also use the Chrome Extension Google Tag Assistant to ensure Google Tag Manager is working correctly.
How to set up Google Tag Manager?
When setting up Google Tag Manager you can make many advanced configurations. So how you set up GTM, depends on what other tools you plan to use in your tag management system.
That's why I brought together all relevant tutorials that cover whatever you could possibly want to set up in your GTM account - with examples. Simply follow this Google Tag Manager guide and thereby create a solid tag management foundation for your site.
Only the tutorial on implementing a data layer requires coding skills or potentially web developers.
Note: In this Google Tag Manager tutorial, we will use GTM by manually setting up new tags and triggers for each event. The approach is not super scalable, but it is fast enough and easy, while meeting most tracking ambitions and still being applicable to other advanced setups.
Larger websites and e-commerce stores require a scalable tag management solution. Therefore a data layer is implemented as the central piece to track events. With such a setup, you can use event handlers instead of setting up tags, triggers and variables for each event.
Set up Google Analytics tracking
This is the first step for everybody. Learn in this guide how to implement solid Google Analytics tracking, with Goals, Funnels, and your own visits excluded from the traffic. Plus more best practices.
Set up event tracking
Once the fundamental tracking implementation is running as it should, you will also want to learn tracking user engagement. How often, for example, does a visitor send form submissions and click on a submit button or another HTML element? My event tracking guide explains exactly that for a button click and you can use the same method for any other click tracking.
Add remarketing tags
The most common use-case for GTM after installing GA is adding remarketing tags to a website. After all, they make the majority of 3rd-party marketing tags and tracking codes that clutter the code base of our sites.
Hence we implement them through our GTM account to keep the code base clean from marketing and analytics tags while taking advantage of the benefits of Google Tag Manager.Let’s learn how to add the most common remarketing tags in the digital marketing space, the Facebook pixel, and the Google Ads remarketing tag.
Add Facebook pixel
- First, you will need your Facebook pixel ID. Visit Facebook’s Events Manager and click the green plus symbol to create the Facebook pixel. Afterwards, your pixel ID will be listed on the screen.
![Event Manager in Facebook shows the pixel ID]()
Find your Facebook pixel ID in the Event Manager. - Then via Google Tag Manager, create a new tag, call it for example Facebook - Page view and visit the gallery fortag templates.
- Search for Facebook and select the Facebook Pixel.
![GTM's template gallery shows Facebook pixel tag]()
Implement the Facebook pixel from GTM's tag templates. - Add your Facebook Pixel ID and click save.
- Set the tag to fire on all pages.
- Afterwards, click submit in the top right corner to push the tag live.
Add Google Ads remarketing
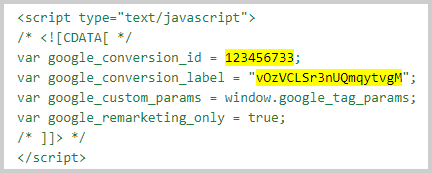
- First, get your Google Ads conversion ID for your audience from Shared Library > Audiences. The user interface changed recently, but look for tag details or setup tag to find the below information.
![Code snippets for Google conversion ID and conversion label]()
Take your conversion ID and conversion label from the tag details in your audience. - Then in GTM, go to the tags section and click on new to add our new marketing tag.
- Give it a name like Google Ads - Page view.
- Choose as type of variable Google Ads Remarketing.
- Set your conversion ID and optionally the conversion label. Then let the tag fire on all pages and click save.
Let me show you in this video: - Click submit in the top right corner to push the marketing tag live.
- First, you will need your Facebook pixel ID. Visit Facebook’s Events Manager and click the green plus symbol to create the Facebook pixel. Afterwards, your pixel ID will be listed on the screen.
Implement a data layer
You will want to implement a data layer if you set up tags on a regular basis and it takes too long and is simply too labor-intensive.
Another benefit is that you can use the information from your database for firing triggers or send it as event data. Other external data sources can also be integrated. Webites that that need ecommerce tracking typically fall into this category.
My article about the data layer explains the implementation, data layer variables and how to configure custom tracking in a scalable way, which is a typical use-case for large ecommerce stores that need enhanced ecommerce tracking.
Best practices for every GTM setup
Each time I set up Google Tag Manager, the setup comes with a few configurations that I add every time. These best practices are applicable and helpful for most businesses and shouldn't be missing in any GTM tutorial. See the list below and pick the ones useful to you.
Further down, you can download a GTM setup configuration with all these best practices to import into your own container.
Track outbound links
To track outbound link clicks means to track any clicks on external links that lead from your website to other websites. Tracking external links is a best practice that let's you know to which websites you send visits and helps you verify the interest of your visitors.
To implement external link tracking, there are three steps:
Create a custom event variable in GTM
- Visit user-defined variables from the GTM overview and click on new > auto-event variable.
- It is supposed to evaluate the link URL of a clicked element and return
trueif thehrefattribute holds an outbound link - orfalseif the link is internal. - Give the new variable a name like Linkisoutbound and select the variable type to be Element URL and the Component Type is outbound. Then click save.
![Settings for outbound link auto-event variable]()
The auto-event variable in Google Tag Manager is going to hold a value of TRUE when the address of the clicked link is outbound and pointing to an external page.
Create a new trigger for outbound links
- In the side navigation under triggers, click new and create a new trigger in GTM.
- Select the trigger type to be just links and name it e.g. Event - Outbound Link.
- Set the trigger to fire on some link clicks and select your new auto-event variable Linkisoutbound to equal
true:![Trigger configuration for outbound link tracking]()
Trigger settings for tracking outbound links.
Create a tag for the GA event
- Visit variables and click configure for the built-in variables. Then activate the click URL variable. Close again and go to the tags section.
- Create a new Google Analytics: Universal Analytics tag named Event - Outbound link with the track type set to event.
- For the category just add
Outbound link click, action isclickand label shall be referencing our newly activated GTM variable. To do that, we use double curly braces{{ Click URL }}. - The event value can be set to
0, unless you can assign a nominal value for an external link (e.g. for affiliate links). - The non-interaction hit setting stays set to
false, because an outbound click is indeed a user interaction. - The Google Analytics settings variable should be the same user-defined variable as in your tag for page views.
![Settings for the Google Analytics event tag to track outbound links]()
Settings for the event tag to track outbound links. - As the last step, scroll down to the triggering section and select the newly created trigger Event - Outbound Link. Then hit save and submit your container changes from the main overview.


Track clicks on email adresses
Clicks on emails are a helpful metric that tends to correlate with phone calls or visits to a physical shop.
To set up Google Analytics tracking for email clicks follow the steps in below tutorial:
Add a new trigger for email address clicks
- Activate the click URL built-in variable. You can skip this step if you’ve already done this in the previous set up. Otherwise: Go to the variables section and configure the built-in variables to add the click URL variable. Afterwards, close the panel and go to the triggers section.
- Under triggers, click new and create a new trigger named e.g. Event - Mail click, set the type to click - just links and let it only trigger on some link clicks.
- In the condition for those link clicks, set the dropdowns to be Click URL, then contains and then just add the string
mailto:
![Trigger configuration for tracking clicks on email adresses]()
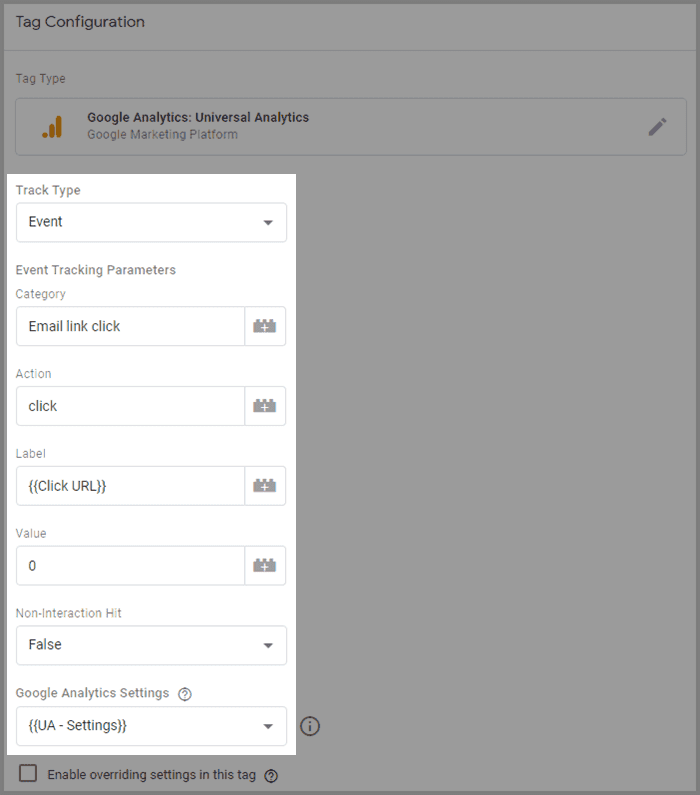
Trigger configuration for tracking clicks on email adresses. Set up the GA event tag
- Create a new tag, select tag type Google Analytics: Universal Analytics and give it the name Event - Email link. Then select event as track type.
- The category can be set to a static string
Email link click, action isclickand label shall reference the{{ Click URL }}. - The event value can be
0again unless you can assign a meaningful value. If you knew for example, that every 10th email contact leads to a 100$ sale, then you could assign 10$ as the avg. event value. - The non-interaction hit should show
false, since the interaction is willingly and therefore active. - The Google Analytics Settings variable should be the same as for your page view tag or outbound link tag.
![Configuration GA email click event]()
Configuration settings of the GA event tag for emails. - The final step is to go down to triggering and select the trigger we just created Event - Mail click. Afterwards, save and go to the overview to submit your changes.

Track clicks on phone numbers
Tracking taps on phone numbers is primarily helpful on mobile devices. Tapping on a phone number link directly initiates a phone call. On desktops, mouse clicks usually don’t initiate anything. But as for tracking clicks on emails, it is a good metric to confirm contact rates overall, because it is correlated with other methods of contacting a business.
Learn to configure GTM for tracking phone number clicks, by following the below steps.
Create a trigger for clicks on telephone numbers
- As with the other guides above, we will need the click URL variable activated from the built-in variables.
- Then create a new trigger Event - Phone click of the type click - just links which only triggers on some link clicks.
- Fill the trigger condition as follows: Click URL - contains and then the string
tel:. Then hit save.![GTM settings for a phone number trigger]()
Settings for a trigger that fires on phone number clicks.
Create a phone number event tag
- Add yet again a Universal Analytics tag of type event and call it Event - Phone clicks
- The category is the static string
Phone number click, action isclickand as a label we use the built-in variable again with double curly braces,{{ Click URL }}. - If you can’t attach an avg. value to a lead call, keep it on
0. Otherwise, add a number for the average value. - Event non-interaction hit should be set to
false, because this is an active, willing interaction. Select the settings variable from your user-defined variables, which you also use for page views.![Configuration GA phone number click event]()
Configuration of the GA phone number click event. - Now connect your newly created trigger with this GA event tag by going down to the triggering area and selecting the new trigger Event - Phone click. The last step is to save and click submit.


Track downloads
Tracking how often visitors download your materials is a good indicator of engagement. Such downloads can be e.g. eBooks, Excel-sheets, images, videos or music.
Tracking downloads works well to distinguish between visitor groups that were not interested in the page content and visitors that indeed were interested and downloaded what you offered.
Follow this tutorial to learn setting up download tracking:
Configure a GTM trigger for download clicks
- Create a new trigger called Event - Downloads, as trigger type choose click - just links which only fires on some link clicks.
- For the condition set the built-in variable Click URL to end with the string
.pdfto track for example PDF downloads. Alter the extension string to whatever file extension you offer for download. - If you want to track multiple file extensions for download we can use a regular expression. Change the condition to Click URL and then matches RegEx (ignore case) and add this RegEx string
.pdf|.mp4|.mp3|.xlsx|.xls|.epub|.jpeg$. Feel free to add any other file extensions that are relevant to your website and remove others that are not. Finish by clicking save.![Trigger configuration for download tracking with a built-in variables]()
Trigger configuration for download tracking with built-in variable.
Track downloads with a Google Analytics event
- Add a new tag of the type Universal Analytics, select event as track-type and name it for example Event - Downloads.
- The event category is the string
Download, the action is the stringclickand the label is the{{ Click URL }}. - Event non-interaction hit is
false, due to the interaction being an active engagement. - And from the user-defined variables, use the same settings variable as in other tracking tags.
![Event tag for download tracking]()
Settings of the event tag for download tracking. - Now add a trigger to this tag by scrolling down and select Event - Downloads.
- Next step, click save, head to the overview and submit the changes.


Guide to test tags and triggers
A google tag manager tutorial wouldn't be complete without a part about debugging. To test any of the previous event configurations and be sure they are working, do any of the following:
GTM Preview mode
First, let's start the preview and debugging mode. In the Google Tag Manager overview, click on the preview button in the top right corner. Then open a new tab in the same browser and you will notice that a GTM debugger window pops up on the bottom.
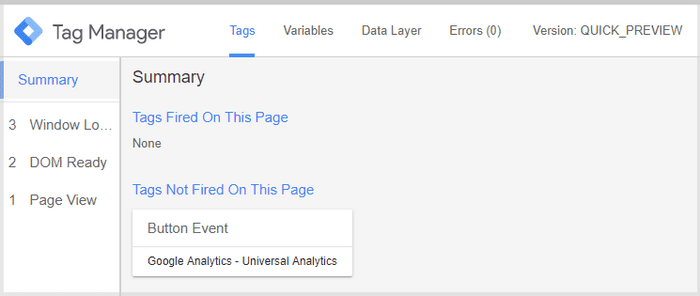
While in preview mode, execute the tags and triggers yourself. Click e.g. on an external link or a phone number and see if the trigger and your tag is shown in the GTM debugger window together with the event details you added.![google tag manager debugger for events]()
The Google Tag Manager debugger opens up automatically, once preview mode is activated and will show data about tags, triggers and variables. Google Analytics realtime report for events
Another method is to log in to Google Analytics and then visit the realtime report for events. The events should show up a few seconds after the trigger fired.![google analytics realtime report for events]()
You can verify GTM configurations with the Google Analytics realtime report. Chrome extension for debugging
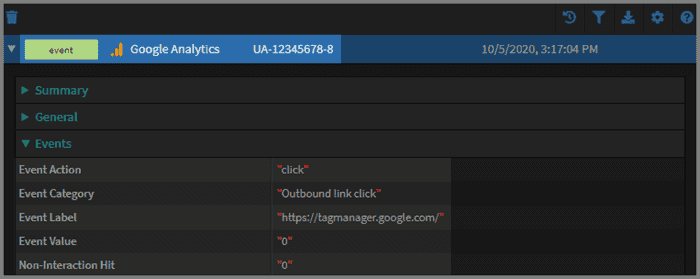
Install a Chrome extension to debug the tag and trigger. I recommend Trackie or Omnibug, but there are other solutions out there as well. Once you added the extension to Chrome, you can open Chrome Developer Tools and there will be a new tab available. It shows you all information about the fired tag management rules. If you then fire your triggers in debug mode, the extension will show trigger and event data.![Trackie Chrome extension shows event data.]()
Trackie Chrome Extension shows event data in Chrome Developer Tools. ![Omnibug Chrome Extension shows event data for debugging]()
Omnibug Chrome Extension shows event data for debugging in Chrome Dev Tools.

Download GTM config container file
Since the above configurations are universally useful to most Google Tag Manager implementations, I created the above GTM setup as a file to import into other Google Tag Manager containers.
It’s a .json file with the settings and naming convention we went through. You can just import the container code without having to set up anything manually.
Either you use it with a brand new container to save time setting the tags up yourself, or you can import them to your existing container and update the Google Analytics settings variable including the tracking ID to your own ID.
You can download and install these configurations (each with tags, triggers and variables) to set up Google Tag Manager:
- Track outbound links
- Track email clicks
- Track phone number clicks
- Track downloads
Simply import the container settings and deploy them. For demonstration purposes, I added a Google Analytics settings variable with a Google Analytics tracking ID of UA-12345678-9.
Please update the GA tracking code to your own or alternatively, change the GA settings variable in the tag configuration to your own one.
Download the GTM setup configuration and see below how to import it.
Import settings into your GTM container
To get the most out of this GTM tutorial, follow the below steps and import the settings to your GTM container:
- go to admin > import container.
- select the JSON file you just downloaded.
- choose a new workspace named e.g. Import Bluerivermountains.
- as import option choose to merge and rename any conflicting tags, triggers and variables.
- click confirm and hit the submit and the publish button to deploy the tags.
Let me show you in this video: - Finally, change the GA tracking ID in the Google Analytics settings variable to your own tracking ID or update the settings variable in the tags to your own settings variable.
Note on personal data
We have to be aware the information we track. Data is not just data, because countries have regulations about data privacy which affect the type of information we may collect during tracking.
Likewise, there are also terms on Google's side, that forbid tracking personal information and send the data to their servers.
On that note:
Generally, emails or phone numbers are personally identifiable information (PII) and we are not allowed to send that to our Google Analytics account, because it’s against their terms of service.
However, the phone numbers on our website or our own company email addresses are hardly private, because it is not the users' data but our own and publicly available on the website.
Never the less, if Google Analytics ever checked their database and found that data, they couldn’t know that it’s actually not PII data.
Therefore, I recommend not to take any risk and obfuscate all email addresses and phone numbers sent to the Google Analytics account.
Simo Ahava did some great work and wrote a custom task script to remove PII from Google Analytics hits and I recommend you implement this along with the above configurations.
It’s not a must, but by implementing it you avoid any potential confusion as to if you hold PII data or not.
FAQ
Do I need Google Tag Manager?
Yes, because your website most likely wants to run Google Analytics and other third-party script tags. Setting all that up is a lot easier and faster with Google Tag Manager. Plus your site loads a bit faster too.
When should I use Google Tag Manager?
Already if you only want to run Google Analytics you should use Google Tag Manager. Setting up event tracking, cross-domain tracking or form tracking are common next steps, but a lot faster and easier with GTM than without. There are built-in triggers for scroll tracking and video tracking too, plus many tutorials online explaining how to set up Google Analytics with it.
How do I use Google Tag Manager with Google Analytics?
Log in to analytics.google.com with your Google account and get your Google Analytics tracking code including the tracking ID. Now, don’t add the Google Analytics tag into the source code of your site. The only hard-coded tag should be the Google Tag Manager tag. So head to tagmanager.google.com to get the GTM code snippet and instead implement that one on every page of your website. Finally, implement the GA code through a built-in tag, add your tracking ID and continue to set up Google Analytics through Google Tag Manager. For adding marketing tags or configuring custom tags, you always use GTM going forward.
What is the difference between Google Analytics and Google Tag Manager?
Google Analytics is the library to collect data about visits and engagement on your website. Google Tag Manager on the other hand is a library running on your site to implement other libraries or tracking tools like Google Analytics. Because many marketing and analytics tools have extra JavaScript snippets, you use the GTM user interface to set them all up.
Where do I put the Google Tag Manager code?
The first part of the code goes as high as possible into the <head> section. I recommend to implement it within the <head> but after any <style> or <script> tags that are vital to render the page - because we don’t want to delay them.
The second part is to enable a basic functionality in browsers with JavaScript turned off. It goes as high as possible into the <body> element.
The logic behind the positioning of both tags is to ensure the early loading of GTM. It enables you to fire custom tags as early as possible during page load.

Does Google Tag Manager include Google Analytics?
No, but Google Tag Manager enables you to implement Google Analytics in seconds with just a few clicks. The only thing you need is your Google Analytics tracking ID. Generally though, you don’t need to use Google Analytics with Google Tag Manager. They are independent of each other.
How do I access Google Tag Manager?
Visit tagmanager.google.com and log in with your Google account to access Google Tag Manager. To start using GTM, create a new account and choose web-property as the target platform. Then take the snippet and install it on each page of your website.