Data Layer
In connection to tag management and web analytics, you may have heard the term data layer. It is the fundamental element in an ambitious web analytics setup because all data points and tracking rules depend on it.
That's why in the digital analytics space it is treated like an nonnegotiable requirement for any analytics setup. However, scenarios in which it is not necessary, do exist as well.
Therefore, I want to explain what a data layer is, its benefits, and the differences between the data layer for Google Tag Manager and Adobe Launch.
Afterwards, we will look at the implementation for the most popular Tag Management Systems (TMS). I will explain the design phase, followed by the implementation and debugging.
What is a data layer?
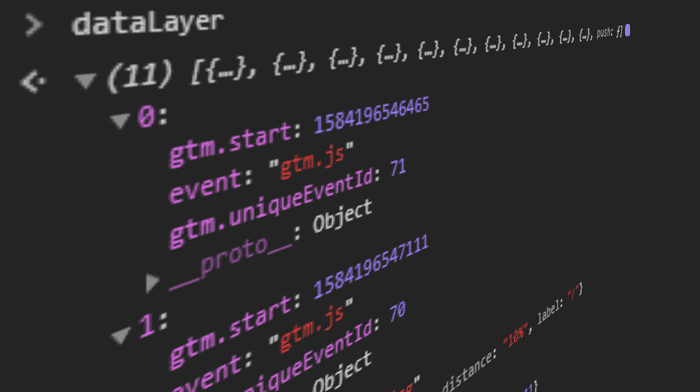
A Data Layer is a data structure that provides relevant information in Key-Value Pairs for use with, for example, Tag Management Systems.
A Data Layer is available in the global JavaScript Scope of the website as an Array or Object and holds data in a structured form for other programs to use.
The benefit of a Data Layer lies in a programmatically simple access to relevant data during a website visit.
It enables access to data at one central point and is the basis for the data analytics logic in a tag management system.
window.dataLayer = window.dataLayer || [{"pageCategory": "category page","pageName": "sneaker overview","language": "en-US",}];
Since it is used to store data from multiple data sources, it simplifies monitoring of current data values, because only a single place has to be observed ("single point of truth").
A data layer is rebuilt on every page load equipped with data points of the current web page and possibly other related data about the visitor and its visit.
Note: Single page applications (SPA) do not reload the page in between the page navigation. That's why the data layer configuration for an single page application is different than for typical web pages with page loads.
The held data represents characteristics or features of a subpage and is held in a key-value-pair. The keys hold descriptive names of the features paired with a current value, which typically changes during the user journey.
window.dataLayer = window.dataLayer || [{"pageCategory": "category page", //category"pageName": "sneaker overview", //name"language": "en-US", //language}];
The overall goal is to make those data points available in the tag management system, so they can be sent along with the data shared with e.g. Google Analytics or Facebook Ads to better describe website interactions.
To enable this integration, the TMS holds references to the key-value-pairs and can for example execute rules once their value changes.
Example: A visitor zooms into a product image and thereby triggers an event "product zoom". Without additional data sent together with the event, it is not very insightful. That's why we also send data about e.g. the product name, category and price, so we can analyze the event in a meaningful context.
The additional data would make it possible to verify if such product zooms only occur in certain product categories. If so, it may be beneficial to add more images to other products in the same category as well, since visitors seem to be very interested in the image details of those products.
The bottom line is, that we structure all relevant data in descriptive keys and values and make those available at a central place where it can be easily picked up.
Such data points are usually important characteristics of the page content or some classification we came up with to segment visitors based on behavior.
To better understand what a data layer is, as a simplified visualization, you can imagine an Excel sheet. The sheet holds important characteristics about a web page in its header (path, language, category, logged-in status) together with a current value for each item.

What are the benefits of using a data layer?
While a visitor navigates through a website many user interactions take place: clicks on buttons, forms that are filled out or watched videos.
If those interactions allow us to draw conclusions about the user engagement they are sent to e.g. Google Analytics together with other descriptive data about the visitor, session, the event itself or the HTML-Element they interacted with.
And this is the crucial point: The additional data to describe such interactions comes from different data sources, for example from the frontend, database or an external API.
To understand the benefits of a data layer, we first have to understand the challenges that come up when we require data from multiple data sources.
Let's look at an example where we're collecting data from such sources and let's think it through:
Example: The visitor buys a product on a website. The following dimensions could be of interest:
- product name
- product price
- product size
- product category
- product color
- shopping basket value
- brand
- initial purchase
- customer segment
- customer discount
- gender
- country
After the purchase visitors land on a thank-you page listing all details of the purchase and delivery address.
Frontend: To send the product data, shopping basket value and brand along with the event, we can potentially scrape it from the thank-you page.
The main challenge of scraping data from a webpage is that the data has to be available on each page where the interaction takes place. This is hardly the case in reality.
It is advisable to measure as many of the same dimensions across all interactions of a website to make the interactions comparable later during data analysis. Hence, if we were to follow that approach, it is likely that other pages don't list product data, shopping basket value and brand name to send along with other events.
So if the needed data is not available on other pages, we want to avoid adding all that data to the content just for the sake of analytics. That's why we use a data layer. It makes the data available for us to collect, no matter if it's visible on the page or not. It is literally a layer of data sitting on top of any given subpage, serving the data we need.
Another challenge of scraping data from the frontend is that it eventually breaks. When pages are changed and those changes affect the HTML structure of the scraped elements, then the data collection will break. Especially in bigger companies, there are frequent changes on pages and multiple teams working on them without knowing if some HTML elements are needed for data collection. Hence, any scraping of data from the frontend will break at some point on frequently updated websites.
A data layer leverages this approach and makes it possible to retrieve user data in a secure and yet simple manner.
Database: Collecting the customer data (customer segment, discount, gender and initial purchase) can get a bit hairy: Customer data would either have to be sent along with the server response or with a separate API.
But since this is private data, the collection has to be authenticated for data protection purposes. That means an API request couldn't be handled in the browser because the API key would otherwise be retrievable for experienced users.
Therefore, the best solution is to send the data together with the server response based on the websites' login authentication.
When the user is logged in, the data layer is populated with the relevant data from the database. Without login, no sensitive data gets exposed.
API: Geo data such as the country could be retrieved from an external service API.
However, the same challenge as when retrieving data from the database arises: Any API requests from the frontend or the tag management system require an API key, which shouldn't be handled in the browser for security reasons.
Another disadvantage of working with APIs for data collection especially with events is the duration until the data comes back. If a user navigates to a different page before the data arrived, we risk losing the event.
Let's summarize the benefits quickly:
Benefits
- Data is available no matter if it is visible on the page
- Robust data collection
- Secure collection of sensitive data
- Mitigating data loss for asynchronous data requests
Why you probably need one
By creating a data layer a JavaScript-Object is made available in the global scope of the browser on each page load.
The data it holds can derive from your database, frontend or APIs, so data collection from those sources becomes reliable, secure and independent of the HTML on the page.
Data from the database can be made available on any subpage of the site without much hassle without being visible in the content.
For the above reasons I generally advise clients to implement data layers if they are serious about their data analysis ambitions. The advantages of data quality, reliability and the related long-term time savings justify the higher implementation efforts.
The ultimate goal of web analytics is to make data-driven business decisions, so data quality should be a priority.
Now, let's look at the different options available and some implementation examples before we dive into the design and implementation phase.
Data Layer for Adobe Analytics, DTM, Launch and Tealium
Data Layers can have different structures. Generally, we distinguish between the ones that come with an object-based structure and an array-based structure.
According to the data layer definition by the World Wide Web Consortium (W3C) the syntax follows the one of a JavaScript object. It is unofficially shortened CEDDL (Customer Experience Digital Data Layer).
You can also nest other objects or arrays in it as well:
window.digitalData = {pageName: "sneaker overview",destinationPath: "/en/sneakers",breadCrumbs: ["home","sneakers"],publishDate: "2020-07-01",language: "en-US"};
Adobe Analytics, Adobe Launch and Tealium follow the CEDDL structure. In the above example, we store data in an object called digitalData. The name is not standardized and can be chosen freely, but you have to declare the name in the tag management system.
To change the data, there are multiple options (as with any JS object) however, the simplest way is to just overwrite the values:
window.digitalData.language = "de-DE";
The central idea of the object-based structure is that they are once loaded per page load, but they are not altered much based on user interaction. The data is mostly static.
Event tracking is not driven by events that enter the data layer object. Events are tracked with a separate tracking library to send them further to an analytics platform e.g. Adobe Analytics. When the event tracking code is executed, the data layer object is sent along in its entirety and can be used during data analysis.
//Event with chosen color_satellite.setVar("sneaker color", "black");_satellite.track("select color");
Use Adobe Launch with an array-based data layer
You can easily use Adobe Launch with an array-based structure too. The Adobe Launch Extension Data Layer Manager makes it possible.
Here are some links to some further resources for using the array-based version with Adobe Launch:
- Jim Gordon’s Demo of using Data Layer Manager with Adobe Launch
- Data Layer Manager Extension with documentation
Data Layer for Google Tag Manager, Matomo and Piwik Pro
The data layer for Google Tag Manager, Matomo and Piwik Pro is array-based and unofficially referred to as the event-driven data layer (EDDL).
Data is handled in objects as well, but the overall structure of the GTM data layer is an array with objects.
window.dataLayer = window.dataLayer || [{"pageCategory": "category page","pageName": "sneaker overview","language": "en-US",}];
The tracking-logic with an array-based structure is different: New data or changes are pushed into it via dataLayer.push(). So a push to the data layer can then trigger tag executions in the tag management system.
The fundamental difference to an object-based structure is that changes are usually sent together with an event and that rules are triggered based on those changes without any additional library, just by observing if the data layer array changes.
Since no other library like _satellite is necessary we require one dependency less.
Another characteristic of the array-based approach is that the data changes rather frequently throughout the user journey since any user interaction may alter the data layer variables.
So an array-based data layer is the basis for event tracking and handles data more flexibly whereas an object-based one rather serves as a static data store.
Through that flexibility, an array-based data layer structure is said to be more suitable for Single-Page-Applications.
However, you can also track SPAs with an object-based data layer, it will just require a few more lines of code and potentially a few edge cases to solve.
If you are at the beginning of a project and have the choice, I would prefer an array-based data layer however.
Changing an already existing setup from an object structure to an array, however, is unnecessary.
Content Management Systems with data layer included
WordPress users have it easy since they can use this plugin to implement Google Tag Manager together with a preconfigured data layer.
It automatically populates with categories, author names, publish dates and search terms.
The data points can be checked or unchecked in the plugin settings. Furthermore, the plugin offers pre-configured events for form submissions of the most common form plugins.
If you're a webshop owner and use WooCommerce for WordPress, you can implement a classic e-commerce data layer as well as an enhanced e-commerce data layer with the same plugin, which is pretty mighty.
WordPress users that want to use Tealium can use a plugin for Tealium.
Drupal also has a plugin.
Wix and Squarespace users can implement Google Tag Manager through the platform-tools but have to implement the data layer code manually.
Data layer implementation
So how do you implement a data layer? - Since planning and implementation require knowledge across the areas of digital analytics, frontend development and backend development, the implementation is usually carried out through a web agency together with an analytics consultant.
The analytics consultant briefs the web agency and leads the project until the implementation is successfully validated. Afterwards the tag management system and analytics tools are configured.
If you are interested and know a bit of JavaScript you can implement it yourself with the followingimplementation guide.
The implementation goes through 3 steps:
1. Data Layer Design
The design phase is all about defining what interactions should be measured together with what dimensions.
Any attributes of the visitor, session, page, product or event can be of potential interest during data analysis and should be considered for the data layer architecture.
To decide what to include, start with the end in mind and ask yourself which business-critical questions need to be addressed and narrow down on the related data points.
The next step is to figure out how those data points must be structured and which dimensions are the most important to add.
Example: A language school running a WordPress website in multiple languages wants to know the native language of their website visitors and which foreign language they are most interested in. The goal is to potentially run online advertising via Facebook Ads targeting demographics with similar attributes.
As a next step, we would need to define all relevant data across different types of pages (homepage, course pages, about us, contact and news). To simplify, let's look at the most interesting pages and focus on the front page and course pages.
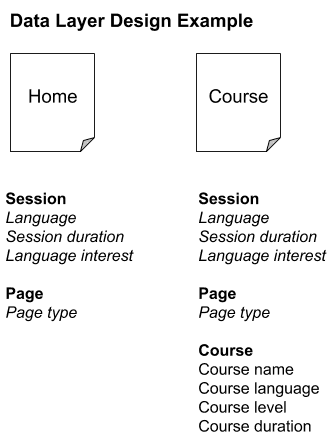
Example: Array-based Google Tag Manager data layer for a language school
window.dataLayer = window.dataLayer || [{"language": "de", //Language of UI"sessionDuration": "182", //Session duration in sec"languageIntent": "es", //most-visited course language"pageType": "course page","courseName": "Spanish A1 - Beginner","courseLang": "es","courseLevel": "a1","courseDuration": "6" //Duration in weeks}];
Example: Object-based data layer for Adobe Launch
window.digitalData = window.digitalData || {"language": "de", //Language of UI"sessionDuration": 182, //Session duration in sec"languageIntent": "es", //most-visited course language"pageType": "course page","courseName": "Spanish A1 - Beginner","courseLang": "es","courseLevel": "a1","courseDuration": 6 //Duration in weeks};
2. Implementation
Data layers have to be implemented on every subpage of a website. The above code examples, however show the final computed state.
During implementation the data points first need to be sourced to compute into their final state, so the actual source is going to look slightly different.
To give a realistic example however, I assume the following:
- Session duration and language interest are collected through a custom-made JavaScript and held in the browsers local storage.
- Language, page type and course data can be retrieved from the database via the server response and made available on the course templates and front page.
The data layer source code in the backend according to the above premises would look like this:
window.dataLayer = window.dataLayer || [{"language": <?php echo wpb_getpagedata("lang"); ?>,"sessionDuration": window.localStorage.sessionDuration,"languageIntent": window.localStorage.languageIntent"pageType": <?php echo wpb_getpagedata("type"); ?>,"courseName": <?php echo wpb_getcoursedata("name"); ?>,"courseSprache": <?php echo wpb_getcoursedata("lang"); ?>,"courseLevel": <?php echo wpb_getcoursedata("level"); ?>,"courseDuration": <?php echo wpb_getcoursedata("duration"); ?>,}];
Event tracking with data layer push
To send events to a GTM data layer you can use its push-method and literally push events into it.
window.dataLayer.push({"event": "course-booking","startWeek": "24"});
The event keyword is a special keyword and can be addressed as a custom event from the GTM container.
The tag management system observes the data layer and executes a tag as soon as a predefined custom event is sent to it.
After an event is added the TMS can for example send an event to Google Analytics.
All relevant data to provide context (name, language, language level, course duration) is available and can be sent along with the event, for example, the start week for the course.
In an object-based data layer, the same event would be directly sent to adobe analytics via their own event tracking library.
For Adobe Launch the example code would look like this:
_satellite.setVar("startWeek", 24);_satellite.track("course-booking");
Code positioning in the source code
The data layer code should be added in the <head> of the page before the tag management system.
Due to this order, you ensure that it is already computed when the tag management system wants to access it.
Example: Positioning in the source code

3. Debugging
The most common procedures to debug a data layer are simulating page loads or events to verify that all data points populate with the correct data.
Since it is globally accessible in the browser console, you can simply print all values to the console (assuming that standard naming conventions are applied):
Websites with GTM
Object.assign(...dataLayer)
Websites with Adobe Launch or DTM
digitalData
Tealium
utag.data or utag_data
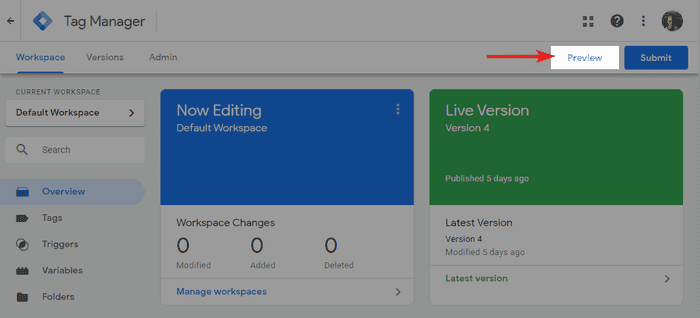
Google Tag Manager even comes with its own Debugger Mode. You can activate it from the GTM interface by clicking on preview in the top right.
In case you don't have access to the tag management container but want to debug it anyway, you can use a chrome extension.
Data Layer Chrome Extensions
There is a variety of potential extensions for debugging out there. I prefer the ones that support most vendors, so I don't have to switch between extensions when debugging another site.
The following chrome extensions are currently my favorites for debugging:
- Trackie - Extension based on Data Slayer and open source. It has a pretty good performance and supports GTM, DTM, Tealium and many more.
- Omnibug - Another all-rounder with support for Adobe Analytics (DTM & Launch), as well as Matomo, GTM, Tealium and more.
Chrome Extensions for debugging Google Analytics and GTM
- GTM/GA Debug - after activating the extension there will be a new tab available in Chrome DevTools once you open them (F12 on Windows and CTRL+SHIFT+i on Mac). All relevant data is shown in a graphical UI and it is updated while you browse a website.
- Adswerve - dataLayer Inspector+ - logs all relevant data points into the browser console. Activate "preserve log" in the console settings, to keep logs across page navigation.
- Data Slayer - definitively the extension with the coolest name and logo and my previous favorite. It is open source with a simple layout and also works with Adobe DTM.
Uncheck “use three-column layout where available”, “show GA Classic tags” and “show Floodlight tags” in the extension settings, otherwise the logs get a bit messy.
Chrome Extensions for debugging Adobe Analytics, Launch and DTM
- Launch & DTM Switch - allows you to load the staging or production library of the tag management system and can activate the debug mode.
- Debugger for Adobe Analytics - activates the debug mode. Alternatively, you can also type
_satellite.setDebug(true)into the console. - Adobe Experience Cloud Debugger - meta extension to debug all adobe products.
- Adobe Experience Platform Debugger - successor of the experience cloud debugger that offers a better overview (currently still in beta).
- Tealium Data Layer Debugger - simple tables of all current values.
E-Commerce Data Layer
Data layers for e-commerce are more extensive and their structure is more complex. They have to hold more data and manage more events.
That's why the planning and implementation of an e-commerce website take considerably more time.
The e-commerce report in Google Analytics, for example, does not show any data if the implementation does not follow their e-commerce data layer documentation.
Large e-commerce stores however require even more advanced tracking setups. They implement a data layer for enhanced e-commerce, which enables even more functionality in Google Analytics.
You need to follow the implementation guidelines for Google Analytics strictly to make the e-commerce reports work. That concerns the data layer structure and also variable names.
If you choose another analytics platform for e-commerce, you are free to plan the structure as you like.
When is a data layer not necessary?
As with anything, there are also cases where the additional effort of implementing a data layer is not justified.
In the above examples, we looked at cases where we pulled data from different data sources (Frontend, Backend, API) and solved problems that came up when working with a variety of data sources.
Many websites (so-called brochure-websites) however don't even have a login functionality nor do they have a database.
Another important factor is how often changes are implemented on the website. Many sites seldomly review their content or add functionality on a regular basis. I even see enterprises run simple brochure websites with about 50 subpages and a contact-form as the hardest conversion.
Since such sites most likely only require data from the frontend to do their data analysis, they could do with a simple analytics setup without any data layer. It wouldn't make the collection part much more robust or more secure, hence its advantages are mitigated. Under such circumstances, the benefits don't justify the additional effort of implementation.
Typical examples of when a data layer is not necessary, are brochure sites or content websites with a limited number or almost no hard-conversions. Usually, such site owners are simply interested in categorizing the user engagement by their content sections or some company internal classifications.
Such requirements can be achieved with some advanced JavaScript and a thought-through system for structuring the content.
As soon as data collection from the frontend regularly breaks and definitely when a database should be involved, a data layer is recommended.
Alternative solutions are often just temporarily satisfying, due to increasingly growing analytics ambitions and regularly breaking data collection. Also, any custom solutions are usually difficult to pass on to another agency.
A data layer has good chances of surviving the test of time because it already is an established concept in the web analytics sector, so web agencies have increasing experience implementing and maintaining one.
Conclusion
A data layer is the gold-standard for professional analytics setups. It increases data quality and thereby improves data analysis as a whole, while fulfilling security requirements.
For ambitious website owners that want to begin with serious data analysis, it is the easiest and most robust solution.
If you have the choice, implement an array-based structure, since you have fewer dependencies and can use it on all kinds of websites.
Content websites however are so limited in functionality and usually only bring a limited amount of hard conversions, so a data layer can potentially be neglected. This holds true especially if all needed data is available on the pages or could be made available through some detours.
If you want to implement one yourself doing it with a WordPress website is probably the easiest. Any advanced requirements however are probably not worth spending the time and risking an unsatisfactory result.
Therefore, implementing with the help of an analytics consultant is usually the way to go, since it saves time and avoids unnecessary risks.
I recommend you to install one of the mentioned chrome extensions to inspect data layers of some bigger websites out there. It is usually a great inspiration and yields some interesting KPIs to potentially integrate into your own analytics setups 😉.
Data Layer documentation of various TMS vendors
- Google Tag Manager: Initiation and changing data
- Adobe Launch: Initiation
- Tealium iQ: Initiation and changing data
- Matomo: Initiation and changing data
- Piwik Pro: Initiation and changing data
FAQ
What is a data layer example?
A data layer example is provided in the article. A JavaScript object stores data from a website, database, or an external source in a central, flexible, and easily accessible manner. An example code snippet for initiating a data layer for Google Tag Manager is: window.dataLayer = window.dataLayer || [{ "pageCategory": "category page", "pageName": "sneaker overview", "language": "en-US",}];
What are data layer variables?
Data layer variables are key-value pairs within the data layer that store specific pieces of information. These variables can include page characteristics, user behavior data, and more, serving as a central data repository for analytics and tracking.
Why use a data layer?
A data layer is essential for robust, flexible, and secure data collection. It centralizes data from various sources, making it easily accessible and consistent across different web pages and user interactions. This approach enhances data quality and reliability, which is crucial for data-driven decision-making.
Do I need a data layer?
While not always necessary, a data layer is generally advised for those serious about their data analysis ambitions. It provides data quality, reliability, and long-term time savings that justify the higher implementation efforts.
What are the advantages of a data layer?
The advantages of a data layer include: Availability of data regardless of its visibility on the page. Robust data collection. Mitigation of data loss for asynchronous data requests. Secure data collection from multiple sources.
Do all websites have a data layer?
Not all websites have a data layer. Its implementation depends on the complexity of the website and the depth of data analysis required. Simple websites may not have a data layer, while more complex sites, especially those focused on data-driven decision-making, likely will.
How do I access the data layer?
The data layer is globally accessible in the browser console. For websites with Google Tag Manager, you can access it using dataLayer or Object.assign(...dataLayer). For Adobe Launch or DTM, you can access it using digitalData.
How do you push to the data layer?
To push to the data layer, you use the dataLayer.push() method. For example: window.dataLayer.push({ "event": "course-booking", "startWeek": "24" }); This method is used to add new data or changes to the data layer. The event-key can be used to trigger another tag execution in the tag management system.
Further Resources
- Simo Ahava about the data layer in GTM and how to handle data in it.
- Read my Google Tag Manager tutorial and learn setting it up.
- Kevin Haag’s presentation from Measurecamp Berlin 2019 about the Event Driven Data Layer in Adobe Analytics